- DIAMOND: cutting blade made from a premium grade of diamond with burn resistant braze to deliver more effective performance than traditional carbide or bi-metal hole saw
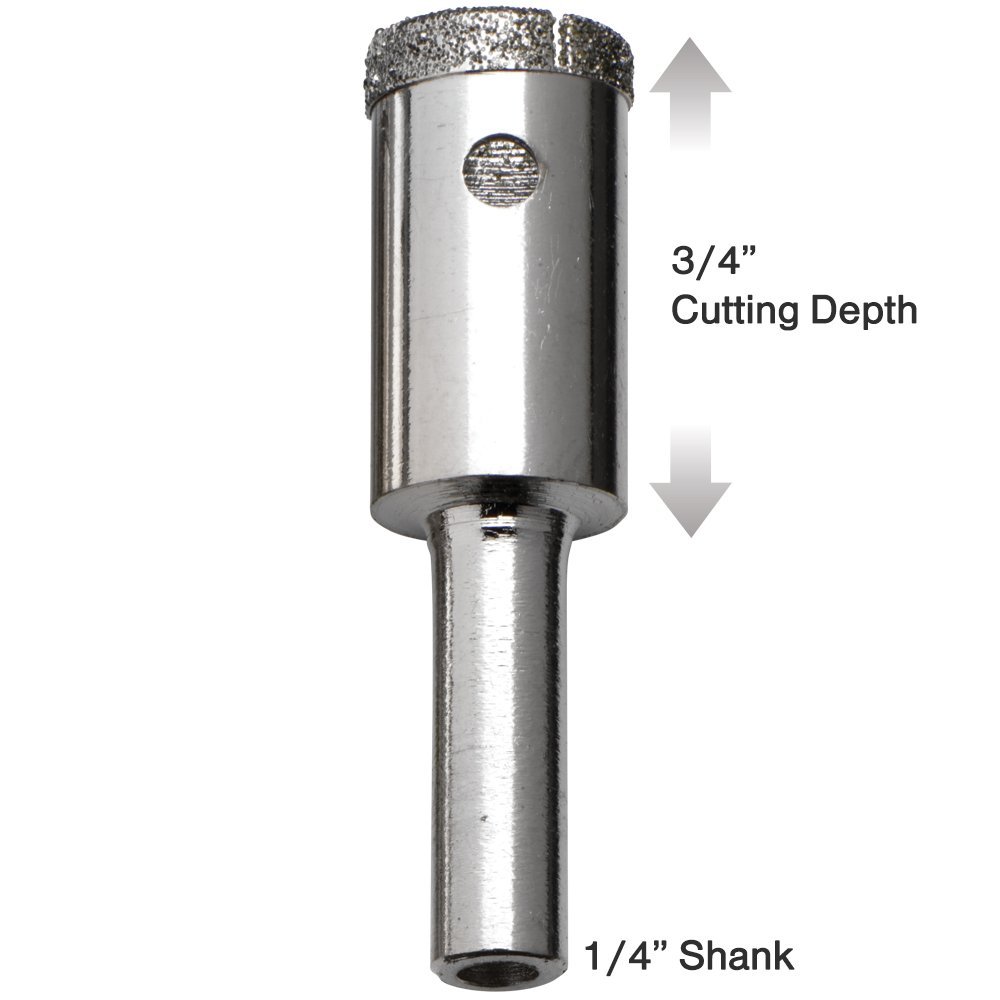
- ACCURACY: CNC machined tip ensures clean and accurate hole cut up to 3/4" deep on hardest and abrasive materials like glass, tile, granite, marble, other stone and porcelain
- DURABILITY: solid one-piece alloy steel construction with heat treatment and extra thick wall for added durability and long-lasting service
- UNIVERSAL: 1/4 inch shank fits all power drills
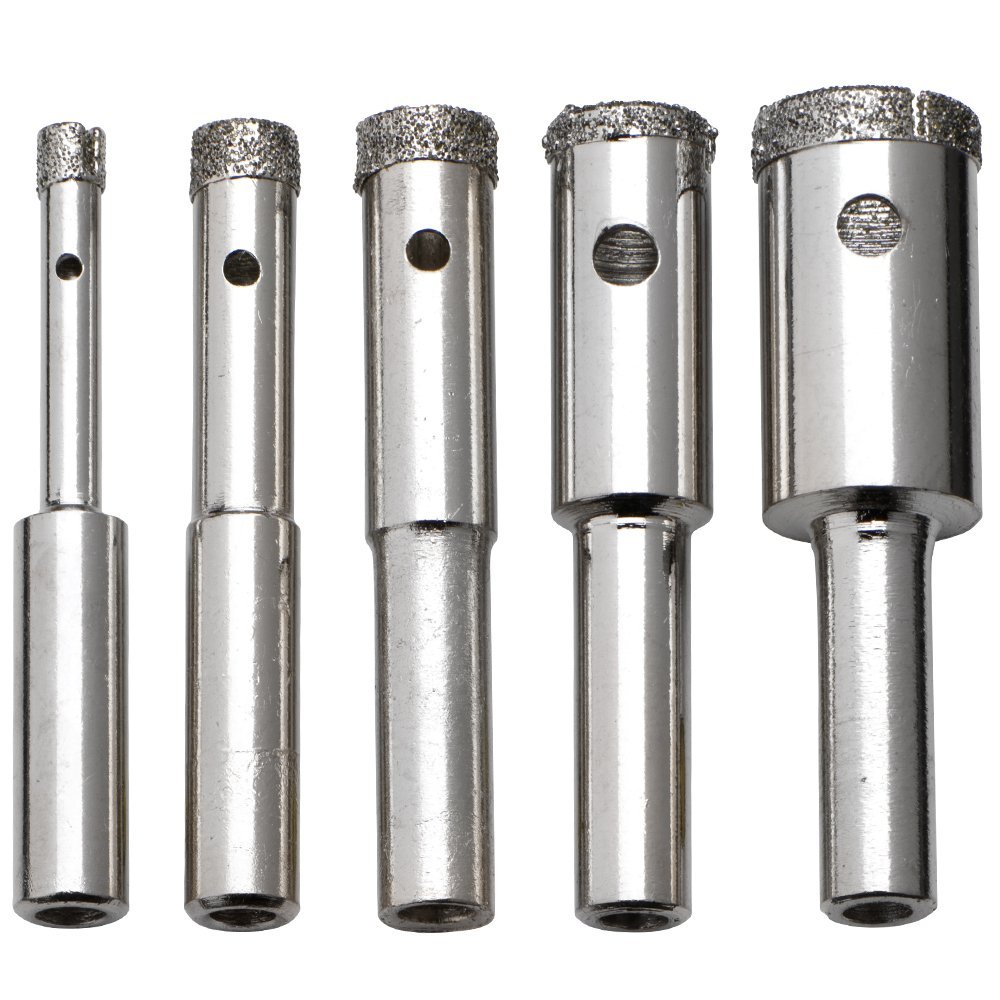
- SET INCLUDES: 5 sizes of drill bits for small holes: 5/32", 1/4", 5/16", 3/8" and 1/2"
Neiko 5-piece 5/32 to 1/2-inch diamond dust hole saw set. 1/4-inch shank size, saw sizes: 5/32, 1/4, 5/16, 3/8 and 1/2-inch. Heavy duty hole saws plated with nickel with diamond coating gives superior performance on ceramic tile and similar material.


By Gary P. Krick
For the money these are outstanding little hole makers. However you must use a coolant fluid while cutting or you will ruin them with one use. I found this out after cutting one dry hole in a wine bottle. If you get some coolant fluid from your local glass company and use it the cutters will last through many, many cuts.
By Bob P
I was skeptical due to the low price but decided to give these hole saws a try on a new ceramic tile shower wall. I needed some clean holes for mounting grab bars and a hand held shower head holder. So far, I have made 8 holes with the 5/16" saw and the saw shows no signs of wear. Some usage notes: To keep the saw from wandering from the desired hole location, I drilled the same size hole, with a standard drill bit, in a wooden paint stirrer and taped the stirrer securely to the wall. I had my wife help with the process by spraying the saw/hole with water from a spray bottle while I was drilling. Also, it works better if you clean the saw out completely between each hole. I would definitely purchase this set again.
By Sara
So I wanted to post this as soon as I did it so I would not forget to do it later. Let me give you a quick background of me:
I don't use tools. period.
BUT as a bored college student only going to school two days out of the week and has too much homework to actually get a job I wanted to have a hobby so I have been looking at Pinterest for inspiration. I got this in order to make a glass bottle lamp. I had watched plenty of YouTube videos and read plenty of How-To blogs with these drill bits as well as reading a lot of reviews on here so I had pretty good handle on how to use this drill bits.
A little nervous to start right away on the bottle I actually wanted to make into a lamp with, I used a small brown glass bottle as a practice bottle. I put painter's tap on the place I wanted the hole to be and placed the drill bit at an angle. It took a few times to get the bit to catch against the glass but once it did the cutting didn't take long! I straightened out the bit and did circular motions with the drill as it drilled into the glass to help it along. I applied very little pressure. Every ten seconds (I actually counted to ten in my head) I would stop and pour a little water on the hole (I suggest doing this outside like I did) and then went back to drilling. After a full minute there was a beautiful hole right where I had planned it to be!
Confident that I could do this, I did the same thing to my Jack Daniels bottle and sure enough (with the biggest drill bit this time - I used the smallest drill bit on the brown bottle in case it got ruined) there was a perfect little hole!
After all the reading I have done I knew that you HAD to use water to not ruin these bits or ruin the glass so DEFINITELY MAKE SURE YOU USE WATER while making a holes.
Overall these bits came in record time, worked great, and will definitely be using them again!

By Anne Pritchard
I've been using these little jewels for over 4 months now, and they are still cutting super clean holes for me. Perfect for cutting holes in glass bottles, and such. Be sure to constantly cool them down by keeping a container of water nearby for both the piece you are drilling and the bit itself. Cool pieces down at least every 20-30 seconds and they'll cut for you much longer! I've used both water and cutting oil, and I find the cutting oil gums up glass bits inside the hole saw, so water is definitely cleaner (and cheaper) to cool down pieces with.
By J. Kimmel
I've been searching for a way to drill through glass for a long time now, and this is perfect! Worked on the first try, and for around $12 this is the best deal around! Don't waste your money on a $40 set from Lowes! Gets the job done!
By R. D. Mcnamara
Perfect for hobby drilling. Using \water to cool drill dozens of holes in glass with out any sign on of dulling.
Great product at a good price.
Great product at a good price.
By lifeisadimension
On a horizontal surface, I drilled all of my 18 holes in porcelain tiles with one bit and at least 16 with another. The last holes took about the same time as the first holes, i.e., 2-4 minutes per hole, using sponge applied water every 15-30 seconds. The water pooled around the drill, which helped a lot, but that pooling won't happen on a vertical surface with the sponge. I used the stainless steel grab bars' mounting brackets' screw holes for a template to start the drilling for about15 seconds. Slowly moving the top of the 20V lithium battery drill in a very small circle helped vertical alignment, cooling, bit wear, and speed of cutting. I used 1/4 to 1/2 the variable speed on the drill with light to moderate pressure. Too many rpms may significantly shorten bit life.
By Lucas Smith
For the price these are a steal. I can't say they are industrial strength at all, but they are more then sufficient for a do it your selfer who needs to drill some occasional holes in porcelain tile :-)
Couple recommendations for drilling that i have found very helpful.
1) getting the start of a hole is very difficult for any drill bit like this (can jump around). you can try to angle the start of a hole to get an initial crescent scratch before going full vertical and getting the full hole started. I personally prefer to use a thin piece of wood and cut a pilot hole (i use a regular drill of the same size for this), and then drill through that to start the hole (i typically use a shim).
2) make sure you have plenty of water in a hole to keep it cool, and take your time drilling. It can take a couple min per hole, but better to do that then to burn out the bit right away. I use my kids play-doh to make a small dam around the hole and then fill it with water.
3) the small bits are hard to clear out sometimes. I usually take a nail and tap it from the reverse end to get the core out
By REINALDO SANTOS
After two carbide drills failures for a 3/8" hole.The perforation depth was only 1/4". As soon as I receive neiko diamond set; it was like doing holes in butter ! 30 sec for a inch depth perforation. GREAT set !!!!
By Mr. Tim
I have found these bits to be good quality.
Upon taking delivery I promptly drilled four holes through porcelain tile with the smallest diameter bit. If you are not familiar with the different material types, ceramic tile and porcelain tile are drastically different in hardness.
Even my wet tile saw has some difficulty cutting porcelain tile. On the Rockwell hardness scale, I believe porcelain tile is rated "hard as woodpecker lips".
The bit, properly cooled, drilled through the porcelain with no problems. Very little pressure is required (allow the bit to do the work) and you do not need to run your drill so fast you could perform a root canal. 500-1000 RPM is more than enough for this bit.
I used the next larger bit to drill two holes through the same porcelain tile with similar results.
There is plenty of diamond remaining on the bits (hard to discern if any is actually missing).
As always, you must keep the bit cool. If you think you are going to motor through even a single hole without liquid cooling you are going to end up with an expensive set of toothpicks (depending on the size of the gap in your teeth).
I suggest Karter Scientific 210P3 500ml Safety Wash Bottle, Narrow Mouth for keeping the bit lubricated. It dispenses the perfect amount of water. I simply put a towel below the wall tile I was drilling and allowed the water to run down the wall onto the towel.
The only criticism is that 4 of the 5 bits do not indicate their diameter. The smallest bit is labeled 4mm, which is equally unhelpful for this ignorant American.
Also, the bits are hollow, so make sure you clean the crud out of them after you use them. I found a twist bit that fit inside the smallest but and used it to push the spoils back out. If you let the bit dry out with that stuff in there I think you will find it nearly impossible to remove later.

Comments
Post a Comment