Jump Start MTPRTC, Digital ETL-Certified Heat Mat Thermostat for Seed Germination, Reptiles and Brewing

- The only safety ETL certified thermostat on the market
- Provides constant optimal temperatures for germination/rooting
- Ideal in homebrewing for maintaining desired fermentation temperature, and perfect for temperature control in reptile terrariums and small pet enclosures.
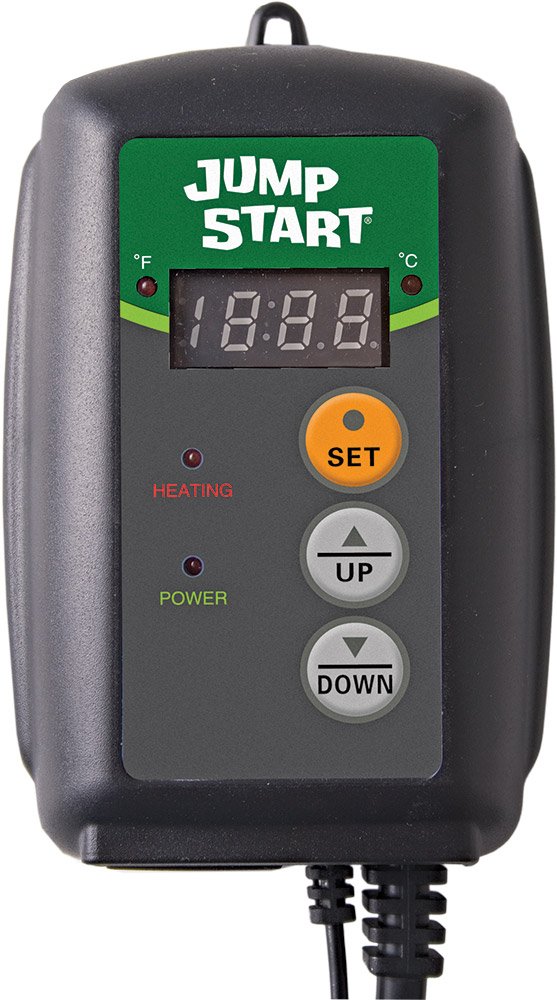
- LED heating indicator light and Digital temperature control
- Controllable range of 68°F - 108°F, Choice of Celsius or Fahrenheit readout (press Up or Down button to change)
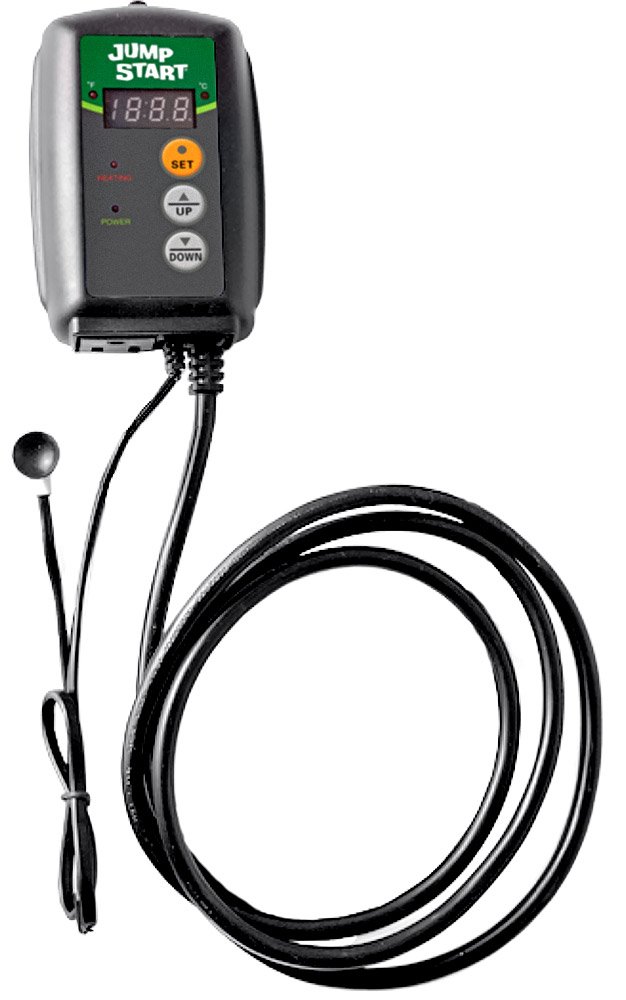
"Hydrofarm's Jump Start Heat Mat Thermostat controls the temperature of heat mats by providing constant optimum temperature for plants, seedlings and cuttings. It is ideal for maintaing root zone/rooting temperatures in a tray and dome. Easy plug-in operation with LED indicator light, digital temperature selection, and three-prong ground plug. Controllable range from 68 to 108 degrees Fahrenheit. Includes temperature probe with 6' cord. Choice of Fahrenheit or Celsius digital readout. Heat mats are not just for gardening anymore! They are very useful for providing consistent, controllable heating for other hobbies including reptile and arachnid keeping (heating for enclosures and terrariums), homebrewing (maintaining of fermentation temperatures), and more. With this thermostat, you can easily expand any heat mat's functionality so that it provides the precise level of warmth your pets and projects require to flourish. The ability to dial in and maintain your preferred temperature means you can rest assured and no longer need to constantly monitor temperature, whether in colder or warmer environments. The Heat Mat Thermostat is the only ETL-certified heat mat thermostat on the market. ETL (Intertek) is a respected inspection laboratory which specializes in product safety testing. ETL certification is proof that a product complies with widely-accepted safety standards. The Jump Start Heat Mat Thermostat is compatible with all heat mats, and is an optional accessory for Hydrofarm Seedling Heat Mats. "


By Jonathan Elizondo
Works like a charm.
Connect the Heat Mat monitor's power cord into the wall, then connect the seedling heat mat's power cord into the monitor.
To set the degrees is very easy. Hold down the button "SET" until the numbers are blinking. Then using the up and down arrows, set the desired temperature then press the "SET" button again to stop the blinking. Also press down the "UP" button for 6 seconds for readings in Fahrenheit or hold down the "DOWN" button for 6 seconds for readings in Celsius.
There is a little wire with a plastic white tip that hangs from the monitor.
Push the white part into the soil for temperature reading.(Once temperature is set, do not be alarmed when your heat mat reaches its maximum temperature you set it to then the Heat Mat monitor temperature will go up and down 3 degrees to prevent over heating)
This is very helpful for starting seeds.
By Dion de Kok
I now have 3 of these. I use them for controlling Flexwatt heat tape on snake cages. They are cheaper than any "animal oriented" thermostats I have found and work better, in my opinion, than Repti therm. I love the digital readout and the easy installation. Granted they are an on off type and are slightly less accurate than a Vivarium Electronics (VE)...but those units run $100-$150 and still have a gradient of +- 1 degree. This unit seems to fluctuate +- 4 degrees. Not good for an incubator...but definitely good for racks or stackable cages. I'll be ordering more once I get more cages.


By Tony H.
I can't speak on how this would work with your seedlings... but for homebrew - Fantastic.
Saw this on Homebrew finds. Looked it over and had a bit of concern regarding the lowest setting being only 68F, but after considering that if I need to lager, I'm not going to need a heat source as I live in San Diego and temps here aren't likely to go below 40F in my garage. So it was whether or not this would work with my ales....
Most of my ale yeast like to ferment at around 70F. A few are below, but are still within Optimum Fermentation Temperature at the lowest setting of 68F. So this is perfect for the job. There are many dual output controllers, that will work with both a cooling and heat source. That's likely a better setup, if I didn't already have the controller for my freezer (which I use as a fridge with a Johnsons control keeping temps above freezing). But since I only needed heat control, this fit the bill.
Setup is about as easy as can be. Simply plug into a wall socket. Plug in your heat source into the controller. I'm using a Zoo Med ReptiTherm® Under Tank Heater, Medium to provide heat. Drop the temp probe into where you need to keep the temperature controlled, and set the desired temp by holding the temp button until it flashes. You can set the temperature to anything between 68 and 108, in whole number values. The swing in the cycle seems to be about 1-2 degrees above and below the set temperature. So for me, it will allow the mat to stay on until 70.5F when set at 70F. It looks to turn on at about 68.5F when set at the same 70F setting.
Overall, happy with the purchase and can recommend for homebrewers.
By J. Hays
I've used quite a few thermostats in my day, to include those specific for snakes that come from Big Apple Herps, etc. But this little digital thermostat is unbeatable for the price and what it does. I've calibrated it with two different, stand alone thermometers and it's been within 1.5 degrees at all times, and usually closer. For basic UTH use I haven't seen one yet that can match it for the price. I've already ordered 2 more and I've only been using them a short while. The true test will be in how long it holds up...if it does this is a secret ZooMed, Big Apple, Zilla, etc. don't want you to know about or else they will have to re-market some of their thermostats at this price range! It's designed for fish tanks but works great in a dry environment as well. I use it with two different UTHs and it handles both well.
I only keep Eastern and Florida Kings now (with an occasional stray herp. I flip from a development site until I can get it a home) so it's range of function from 68 to 108 degrees is just right for my collection; the unit will shut off automatically if the heat gets about 108 degrees. Unless you get a defective unit this is pretty much idiot-proof.
Again, great product for a great price if it fits your needs.
By offTheYozaBubs
Nothing more to say than this is a great product. Not only does it work, and by work I mean constantly regulating the UTH pad for my leopard geckos. If its getting too hot, it shuts off and cools down. If it gets too cool, it clicks on and heats back up to the set temp you program into it with a simple click of a button.
The icing on the cake is it looks really cool. I've mounted it on my wall in between by gecko tanks, and I've got so many compliments in just a couple days of owning it. The constantly changing lit up temperature numbers makes this so much better than a cheap rheostat.
I was so impressed and pleased with this product that I've already ordered a second for my other tank and will have it arriving tomorrow. All of my gecko's I know are now very safe, happy, and always warm at a good safe temp.
I have pics up I'm going to upload of my setup with this product. Hydrofarm MTPRTC Digital Thermostat For Heat Mats

By Kl
I have used Hydrofarm seedling heat mats, thermostats, and lighting systems for years now and can attest to overwhelming success these have afforded me in getting my garden plants started in late winter.
This thermostat is a perfect accessory to help keep your plants at the proper temperature. Depending on where you set up your seed starting equipment, you may find this thermostat indispensable. Seed heat mats are designed to keep your seed tray about 10-20 degrees above ambient temperature. If you keep yours indoors in a 65-70 degree environment like I do, you might consider getting this thermostat to keep your young plants from getting too hot.
This thermostat is easy to perform the initial set up on, then very easy to make adjustments to if needed. It has an integrated probe for placement into the soil so that a direct reading can be taken and regulated accordingly.
Heat mats and proper lighting are the key to consistent and prolific germination of seeds started in late winter to be ready for springtime planting.
Here's the setup I've used for the past few years:
-Park Seed Park's Double Bio Dome with 80 Jumbo Cells. I actually use 2-18 Jumbo Cell for a total of 36 plants. There are several sizes of the Bio-Dome system. I have the DOUBLE Bio-Dome which allows for two seed starting cells (Purchased from Park Seed)
-Hydrofarm MT10008 20-by-20-Inch Seedling Heat Mat (Purchased from Amazon)
-Hydrofarm FLT24 2-ft/ 4-Tube T5 Commercial System with Bulbs (Purchased from Amazon)
-Hydrofarm MTPRTC Digital Thermostat For Heat Mats (Purchased from Amazon)
-Style Selections 36-in H x 24-in W x 18-in D 3-Tier Steel Freestanding Shelving Unit (Purchased from Lowe's)
The modular, adjustable wire shelving unit gives me the foundation for my indoor winter seed-starting setup. The shelves are adjustable so that I can hang the grow light on the underside of the top shelf, then adjust the middle shelf so that the top of the Bio Dome is about 6-8 inches from the light. This allows for enough room to remove the top of the Bio Dome in the event I need to access the plants for watering, fertilizing, etc. The bottom shelf is great for storing my remaining planting supplies.
The light is almost the same size as the Double Bio-Dome and provides 100% light coverage necessary for young plants to thrive. A few years back, I tried to use a light that was only 2 bulbs and half the size of the one I currently use. You could tell that the young plants would angle toward the light hanging in the middle, and those on the outer edges didn't grow as quickly and tall as those in the middle. Take it from someone who spent $25 - $50 each year over the course of several years trying to find a light that would work well with my seed starting system. I knew about the Hydrofarm light early on, but wasn't too eager to purchase it due to it's higher cost. I wish I would have gotten it first because I would have saved money in the long run considering the poor-performing lights I purchased in years prior to getting the one listed above.
The Park Seed Bio Dome is an extraordinary seed-starting system that allows your plants to grow quite large without root binding problems found in other tray-type seed starting setups. Park uses the styrofoam cell matrix with replaceable organic bio-sponges in which the seeds are planted.
I regulate the temperature of the seed heat mat with the Hydrofarm MTPRTC Digital Thermostat set at between 85-90 degrees. This thermostat has a temperature probe you can insert into one of the organic bio-sponges to obtain a direct soil reading. I route the probe through one of the vent holes in the lid of the Bio-Dome.
In order to capture the most heat from the heat mat, while allowing the thermostat to regulate the temperature of the mat, I first take a folded beach towel and place it on the middle shelving rack. I then set the heat mat on top of the towel, then place the Bio-Dome on top of the heat mat. This allows me to recover most of the heat that would otherwise radiate from the exposed, bottom side of the heat mat.
Watering with the Bio-Dome setup is easy and, depending on how you have the vents adjusted in the lid, performed infrequently at best due to the efficiency of water vapor recovery of the Bio-Dome system.
I typically start tomato and pepper plants in mid-February so that they are ready for planting by the first week of May. You may want to check online for your indoor planting and outdoor transplanting dates depending on your region and climate.
I hope my sharing with you what has worked quite well for me will help you in your seed-starting endeavors!
By TXKajun
I'm starting to grow ultra hot peppers that need 80-90 degrees to germinate. I got a mat and this thermostat controller to give them that extra boost. It holds 85 degrees +/- 2 degrees day and night inside our little growing room. I got excellent germination rates on almost all of my pepper seeds. Great product!
By Kettric
I use the old heating pads for starting seeds indoors that don't have the auto shut off and was using a darkroom thermometer to keep tabs on the soil temperature. I found it to be something of a chore because I'd have to keep checking the temperature every hour or so.
With this, you just plug your heat mat into it, set the temp you want your soil to be then place the probe in the soil and plug it in. So far works awesomely! I'll probably end up getting another one for next year.
With this, you just plug your heat mat into it, set the temp you want your soil to be then place the probe in the soil and plug it in. So far works awesomely! I'll probably end up getting another one for next year.

By Glen Bagwell
This thermostat takes all of the guesswork out of achieving optimum growing temperatures for sure. The product works exactly as advertised. The only drawback is that mine came with a temperature probe that was a suction-cup type of device rather than a true probe. I have simply buried the suction cup into a small pot of soil that sits next to my plants (remember to keep the soil moist).
I have had a heat mat for 2 years now and have used it without a thermostat. The major problem with this arrangement is that I needed to put my heat mat on a cycled on/off timer throughout the day/night to sort of generally hit the temprature range I wanted. With the thermostat the heat is exactly the temperature I desire all day long. This has made a tremendous difference in my growing results. So far (this year) I have germinated my sweet bell peppers at 85 degrees F, and have grown the seedlings at 72 degrees F. What a difference! This is my best crop ever!
I have had a heat mat for 2 years now and have used it without a thermostat. The major problem with this arrangement is that I needed to put my heat mat on a cycled on/off timer throughout the day/night to sort of generally hit the temprature range I wanted. With the thermostat the heat is exactly the temperature I desire all day long. This has made a tremendous difference in my growing results. So far (this year) I have germinated my sweet bell peppers at 85 degrees F, and have grown the seedlings at 72 degrees F. What a difference! This is my best crop ever!
By Blues
This temp control works well. My heat mat was rising the temp to 81 degrees. With this control i'm doing two 48' mats and the temp setting is at 72 degrees and 68 degrees and that's what the mats stay at. It's nice to be in control again.

Comments
Post a Comment