
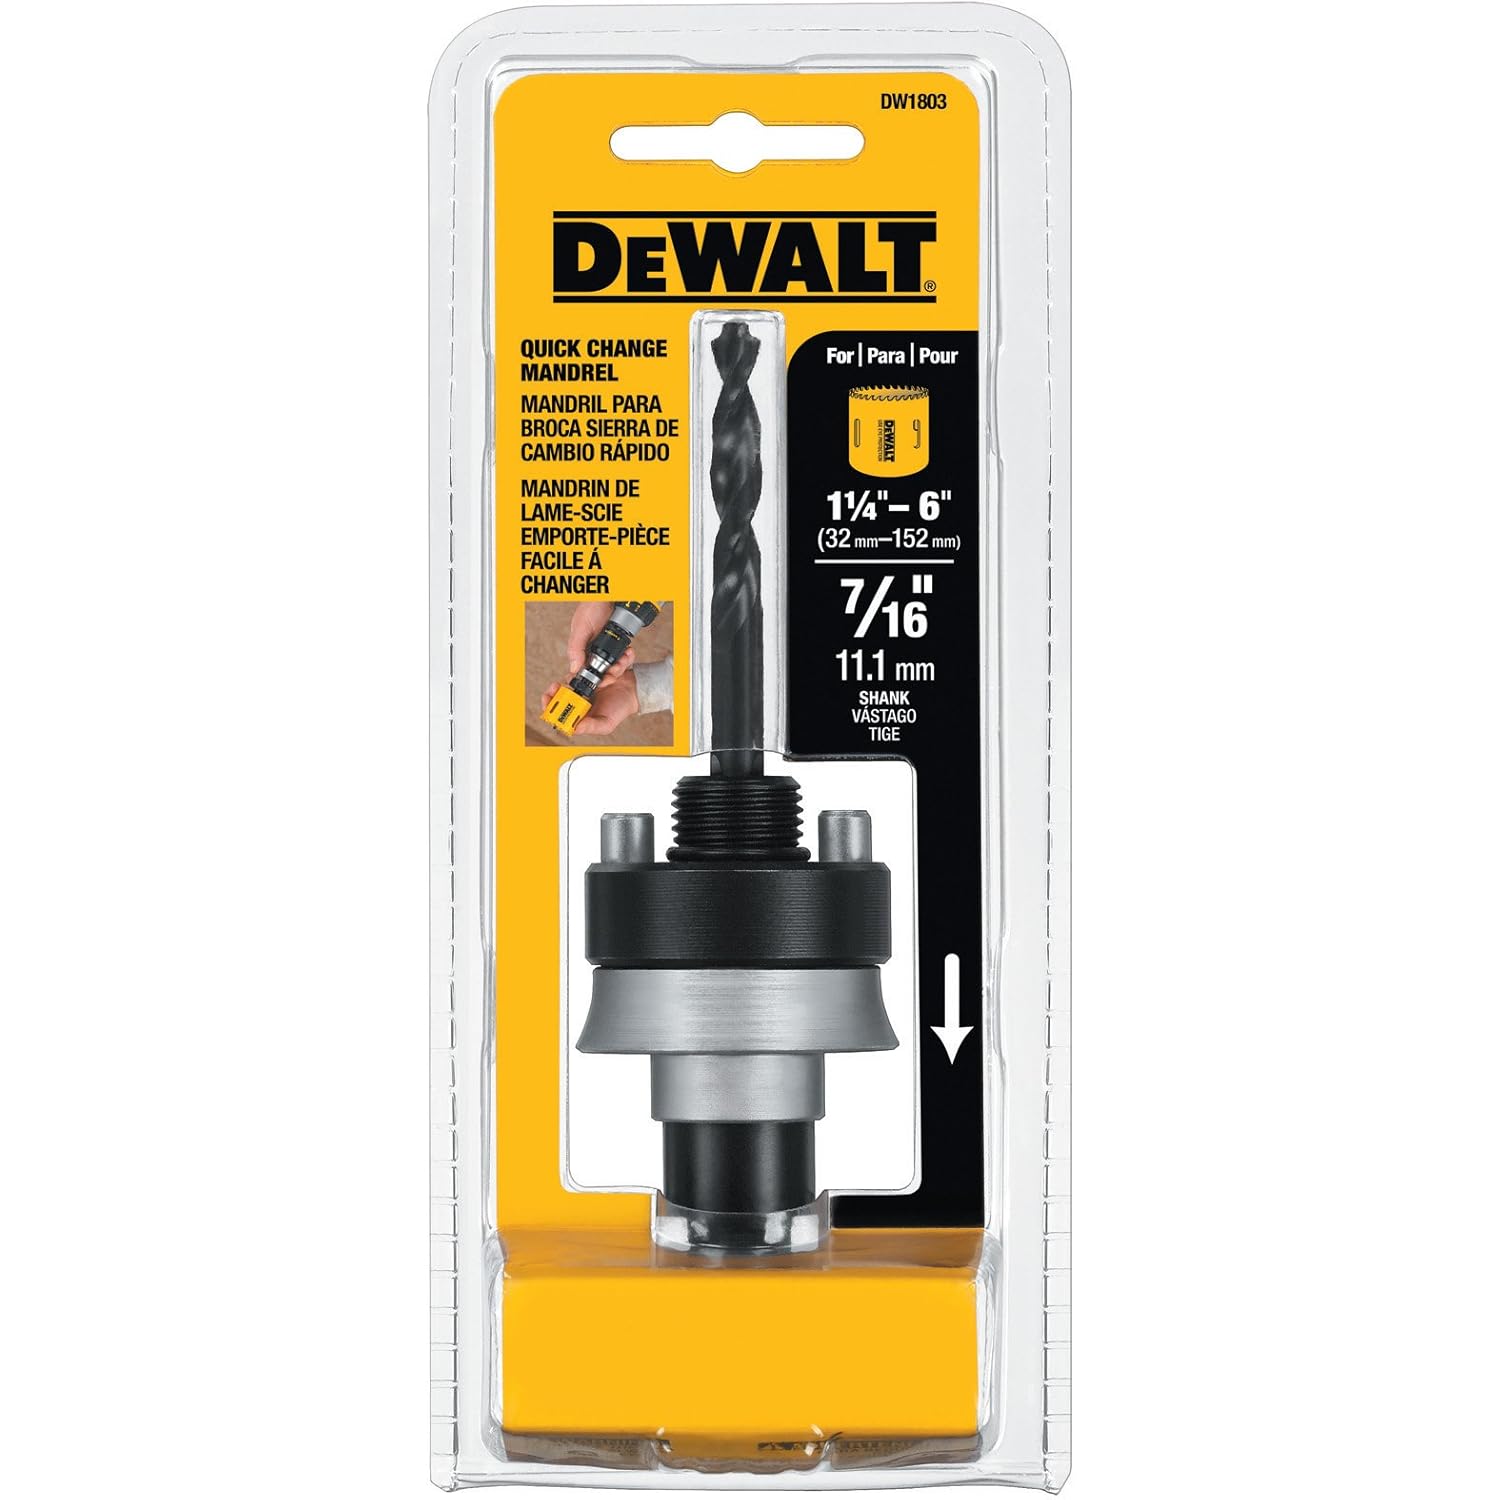
- DW1810 offers tool-free quick-release collar to prevent hole saws from locking to the mandrel
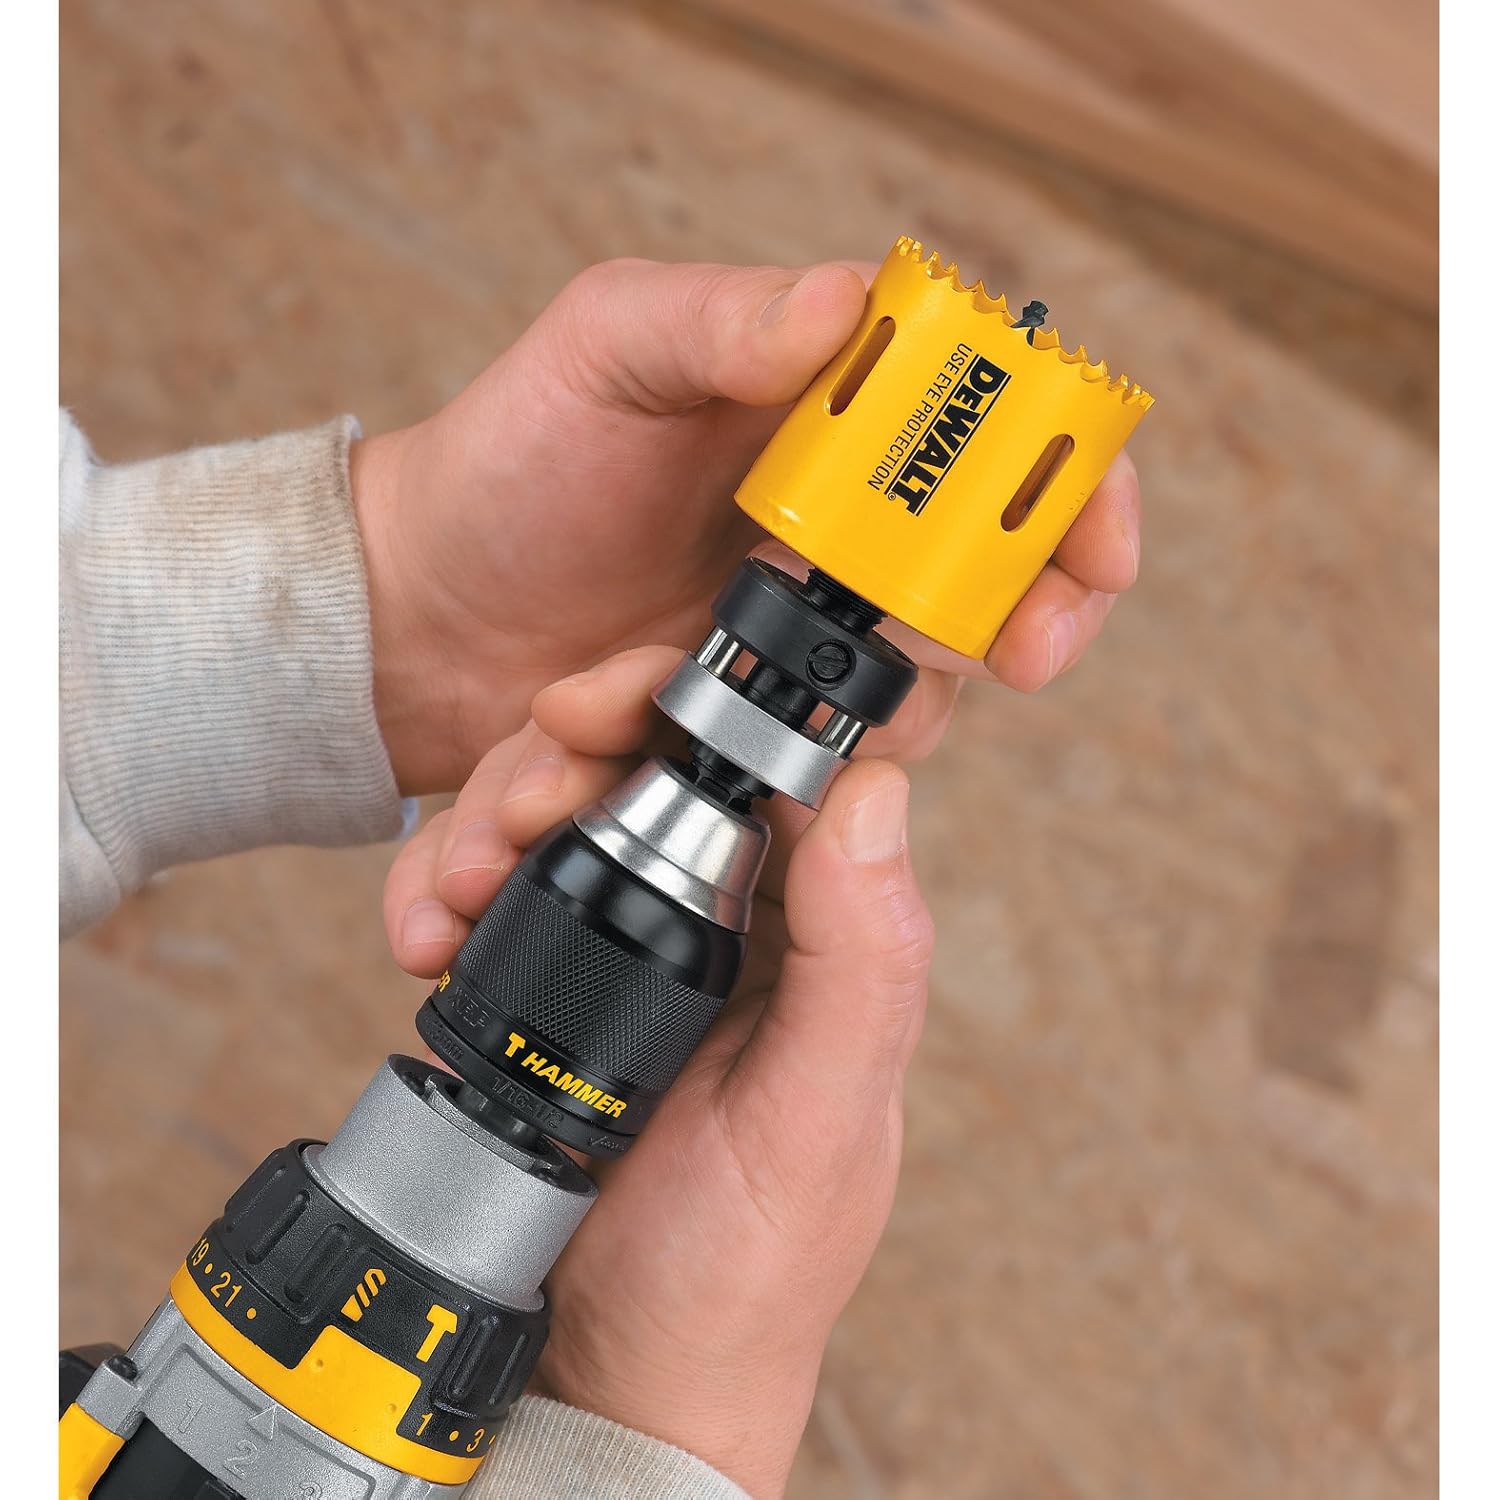
- DW1803 and DW1805 offer spring-loaded collar that automatically engages drive pins to prevent hole saws from locking to the mandrel
- All quick change mandrels feature double set screws with a recessed combination head for quick and easy centering bit changes
- All quick change mandrels utillize hardened steel construction and have been tested through 15,000+ cycles to deliver jobsite durability
- DEWALT offers a full range of standard and quick change mandrels for versatility in a wide range of hole saw applications
- Fits Hole Saws 1-1/4-Inch to 6-Inch
DEWALT's Heavy-Duty 3/8-Inch Shank Quick Change Mandrel features a spring-loaded collar that automatically engages drive pins, a patented Pilot Point tip that allows for faster penetration of materials, and double-set screws with a recessed combination head making it easy to quickly change centering bits.


By DoogieWater
I have utilized several manufacturer's hole saw mandrels performing electrical work, routinely drilling light guage steel, aluminum, bronze, silicon bronze, stainless steel, plastics, and wood. Some mandrels are difficult to change from one size hole saw to the next because of inexpensive hex set screws stripping. Soooo aggrevating! Others, made like the Dewalt mandrel compare with an exposed spring release, but the spring being exposed, many times shavings interfere, it can be damaged, ruining the spring and making it difficult to unscew the locknut. I have found the Dewalt Mandrel to be easy and durable. Of course, drilling with hole saws can be dangerous and one should always be cautious, not agressive, allowing the saw to perform at it's own rate, especially when penetrating a variety of materials. I have yet to have this mandrel break or cause problems. It has proven to be very reliable, and I have been utilizing it for almost a year, drilling hundreds of holes (2-3/8" - 4-1/2"). I am sure, as with most attachments for power tools, even with the best of care, they will eventually have to be replaced. But, at this rate, my DeWalt Mandrel has paid for itself several times and has proven to be very effective and safe. "SAFETY FIRST"
By Bob Hjermstad
This quick change Mandrel is required when using other style hole cutting saw blades. I have used this style for many years at work and in my wood shop. It works with many different size hole saw blades and is well worth the price.
By FR in VA
This worked perfectly. I needed to drill a large hole in the side of a Pelican case. The material is plastic, about 1/4" thick. The bit of the mandrel didn't walk or slide around in the plastic, it just dug right in.
Installation of the hole saw was easy, pull the collar back and thread the saw on. When I first pulled it out of the packaging, I was afraid that it wouldn't fit my rechargeable drill but it fit just fine.
Installation of the hole saw was easy, pull the collar back and thread the saw on. When I first pulled it out of the packaging, I was afraid that it wouldn't fit my rechargeable drill but it fit just fine.
By Radio Relay
It worked out ok, but be aware that this mandrel requires a drill with a 1/2inch chuck. I had to go buy a new drill in order to use this, but heck, I needed a new drill anyway. It was annoying to have to stop in the middle of my project to go get another drill, but I should have paid attention to description. Don't make the same mistake, or you'll need a new drill too. The again, what a great excuse to get a new drill.
By Ryan Flagler
I've only ever purchased cheap hole saws and shanks from my local discount tool store. I've had hit and miss luck with those. Usually they end up wearing loose and the hole saw begins to wobble. When purchasing this, I had a hard time believing you could "quickly" swap hole saws with this thing and that they would still be held on tightly. Let me just say, this thing works amazingly well.
It attaches with threads that screw into the back of the hole saw blade. Once you get about 1/4" in, you pull the silver colored part away from the the back of the hole saw blade and screw another 1/4" or so. When you release the silver part, it releases 2 pins that will line up with the hole saw blade to lock it into place. Quick, easy, no tools required and it is SOLID. I am very happy with this product and would not hesitate to purchase it again.
It attaches with threads that screw into the back of the hole saw blade. Once you get about 1/4" in, you pull the silver colored part away from the the back of the hole saw blade and screw another 1/4" or so. When you release the silver part, it releases 2 pins that will line up with the hole saw blade to lock it into place. Quick, easy, no tools required and it is SOLID. I am very happy with this product and would not hesitate to purchase it again.
By B.T.
Easy to use, bought it to drill grommet holes in a desk and wound up using it for many things!!! Great for starting cutouts in drywall. I used it to start holes for in-wall speakers. Tough and durable, well made, heavy. Nice adjustability of the center drill bit inside the circle saw component.
By Amazon Customer
This worked great and the long drill bit made it easy to back cut through the finished side. It has a unique way to connect to the whole bit. You screw it on and it snaps, that lock it all together. I highly recommended it to all. Great quality and price too.
By tsel_shaddai
I bought this for use with a 3 5/8" carbide grit holesaw. This is great, except the bit wouldn't hold up in plaster. I either needed to change the bit out for a masonry bit, or predrill the pilot holes with a masonry bit (for now, I've done the latter). This is easy to install and remove, allowing for easy removal of the plaster I'm drilling from the holesaw.
By Ernst W. Mayer
As this was my first hole saw and I didn't already have the mandrel portion, I ordered the combo of 2"-dia (2"-max-depth) hole saw and 7/16"-shank mandrel [DW1803] recommended by Amazon. The 7/16" mandrel shank is too large for my venerable 3/8"-chuck corded Black & Decker drill, so I used it in my 1/2"-chuck cordless Dewalt drill. In retrospect, since the mandrel shank is nicely hex-shaped to prevent slippage within the chuck, the similar 3/8"-shank Dewalt mandrel [DW1805] would have also worked just fine. If you only have a drill with a 3/8" chuck or have drills with various chuck sizes like me, that's the one you want.
To newbies like me the quick-change mandrel is a little confusing at first, so thanks to the previous commenters who provided tips on how to use it. Briefly, the Dewalt quick-change mechanism is both a locking and anti-locking device. The 2 pegs in the silver-colored locking collar snap into one of the 2 opposing-hole pairs in the bottom of any Dewalt hole saw to hold the cutting end in place, but at the same time prevent the hole saw from locking itself onto the mandrel under the torque of drilling. Just slip the mandrel shank into your drill chuck & tighten down, then with the drill positioned the way you'll be using it (butt end against your belly), use one hand to pull the locking collar toward you as far as you can, and the other hand to screw the barrel end of the hole saw onto the threaded part of the mandrel. You should end up such that tightening the barrel part all the way down leaves the locking pins misaligned with both of the crosswise pairs of receiving holes, at which point you unscrew the barrel just enough to allow the pins to snap into the nearest hole pair. In my case this left a very slight gap between the flat bottom of the barrel part and the mandrel but there was no discernible looseness of the hole saw, which I expect is exactly as intended by the assembly designers.
For precision work I found it helpful to drill a 1/8"-dia pilot hole which helps center the 1/4" pilot bit of the mandrel and get the cut started nicely. Once the annular cut is established the hole saw is conveniently "self-centering," since the entering portion of the barrel has no choice but to follow the outlines of the existing annular cut. It can be surprisingly tricky to keep the hole saw axis aligned precisely at the proper angle, so when precision is needed, I recommend drilling at least one practice hole in a scrap block of wood of the same or similar kind as the actual target material. My first (practice) hole ended up a dismaying 3-4 degrees off-kilter, but my second was better. If you really need precision and will be cutting multiple holes, I suggest setting up some kind drilling jig to keep things moving at the desired angle.
As others have noted, gentle circular rocking of the hole saw - but not enough to jam up the cut - helps clear the sawdust out and keep things progressing smoothly. The very sharp teeth of the hole saw are in a slightly-offset staggered pattern which cuts a 1/8" kerf, slightly wider than the walls of the barrel are thick, in order to prevent jamming and allow the resulting sawdust to flow out easily.
I used the 2" hole saw to form the male end (tenon) of something I call a "peg mortise", in a pair of 4x4s joining at right angle [See here for pics: http://www.mersenneforum.org/showpost.php?p=409015&postcount=84/]. (Being strictly an amateur carpenter, I don't know if there is a different 'standard' name for this type of joint.) Here the 1/8" kerf width of the Dewalt hole saw proves very handy in a further way, because I then used a standard 1.75" auger bit to drill the female end (mortise) of the joint, and everything fit beautifully. (I could have also used a 1.75"-OD hole saw for this, but didn't own such a one, whereas I did have an auger bit of the needed size. An auger bit for the mortise hole requires more material to be removed, but has the advantage of not leaving a wood plug that needs to be chiseled out - pretty much a "six of one, half-dozen of the other" deal. On the other hand if your mortise goes all the way through the piece of receiving wood, a hole saw will definitely be more more efficient for that kind of hole.) Lastly, I used the centering hole left in the tenon by the pilot bit of the hole-saw mandrel by drilling a same-1/4"-diameter hole the rest of the way through the center of the mortise (which in my case only went 1.5" sideways into a 4x4, roughly halfway through) and then using a lag screw started from the opposite side of the 4x4 to firmly fasten everything together. The above link has pictures and more details. A very nice way of doing such joinery when appearance matters and you can't just slap things together with a metal joist hanger or whatnot.
All in all, a great tool(set)! Thanks to the folks at Dewalt for really thinking the design through and - as always - manufacturing a professional-quality product, built to last.
By Ellis Guy
There's not much to say about this other than it works as represented. The hole saws change easily and it works flawlessly in my experience. Of course, the end result is going to depend on the condition of the hole saw itself, not the mandrel. If one uses a sharp hole saw and does so with good procedure, the result will be great. If not, then you take your changes.

Comments
Post a Comment